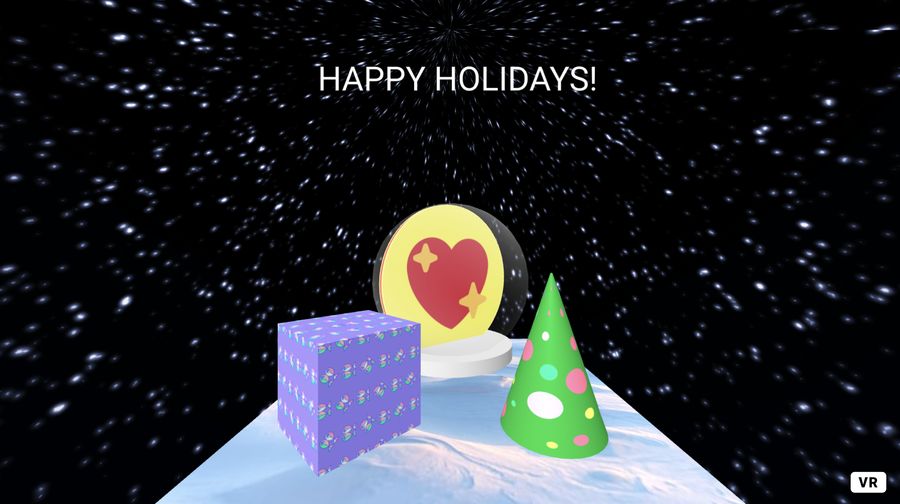
Make a VR greetings card in just a few steps
The WebXR community has been building all sorts of amazing immersive experiences on Glitch, as well as fun, low-barrier learning projects you can use to start trying these techniques out yourself. In this tutorial, we’re going to walk you through creating a virtual festive greetings card you can share with your friends! It’s totally free, and all you need is the regular web browser you already have. You’ll be using A-Frame, a framework for building VR apps for the web–the team and community have built a ton of handy apps you can remix and edit surprisingly easily.
Get started: Remix the project #
Log into Glitch and remix: ~aframe
Remixing will create your own copy of the project–it’ll open in the editor and you’ll see the preview of the app on the right.
Take a quick look at what’s in the project–there’s not much there! We’re mainly going to be working in index.html, so open the file for editing.
Hit the Format This File button at the top of the editor to format your code–this is going to make it easier to read and work with!
Near the top of the HTML you’ll see the A-Frame script being imported–this is all you need to start working with the framework. Now look at the page body, where you’ll find the markup representing the A-Frame entities and components. Take a minute to compare the elements in the markup with what you see displayed in the preview.
The initial scene includes a box, sphere, cylinder, plane, and sky. We’re going to edit these to make them festive and add a little animated interactivity. You don’t need a VR headset for any of what we do in this tutorial, but it is fun to view in one if you have it (even a cardboard viewer on your phone)!
*We’ll include images you can use in your project below but feel free to use your own–if you make a nice version you want to show off please let us know! You'll also find all of the pics in the final ~festive-aframe demo project embedded near the end of the tutorial.
Set the scene #
Let’s start by adding a night sky background for our festive scene. Save this image:
In your Glitch project, upload it into assets. Once uploaded, select it and copy its URL.
In your HTML, find the sky element, remove the color="#ECECEC" attribute and replace it with a src attribute using your uploaded image URL as the value, so it’ll look something like this:
Let’s also make the plane under the shapes look wintery. Save this snowy pic and upload it into assets:
Replace the plane element color attribute with a src attribute using the URL for your uploaded snow pic (make sure you remove the color attribute or it will tint the image):
Wrap the present #
Let’s turn the box into a parcel. Take a look at the a-box element, which is a primitive shape. The attributes specify the box position, rotation, and color (this is just a hex value like you’ll see in HTML and CSS):
- The position is represented by x, y, and z values–the z can be tricky to get accustomed to when you start learning to work in 3D so you might like to play around with the values later to get a sense of how they work.
- The rotation is represented as around the x, y, and z axes (known as pitch, yaw, and roll)–again, messing around with these in your own project is the best way to get to grips with them. You’ll notice that the shapes have light and shade added automatically–this is due to the default lighting, but you can change it.
Instead of a block color, let’s give the box a pattern asset to make it look like a parcel. Save this image:
Upload it into your assets also and copy the URL.
Back in index.html, remove the color attribute and instead add one for the image source, with the asset URL as it’s value–it should something look like this:
Keep hitting the Format This File button as you edit the file to make it easy to see your changes.
Your preview should update with the new pattern!
Plant the tree #
Let’s turn the cylinder into a tree. Make it a cone shape by changing the opening and closing tags from a-cylinder to a-cone. Tweak the size–the cone accepts an attribute to set the bottom radius, so change radius to radius-bottom, leaving the value at 0.5.
OK so far so good, but it doesn’t really look like a tree yet–we’ll use another image asset for that, so save it:
Upload it in your assets like before, copying the URL. Back in the HTML remove the color attribute and replace it with a src attribute that looks like this:
Add the snowglobe #
Let’s turn the sphere into a snowglobe–first we’ll need to make it look like glass. Save this opaque PNG (it's there, honest, right-click or control+click below):
Upload it into your project assets as before. This time we’re going to use it as a texture, so we’ll add a new section to the A-Frame scene to store assets–near the top of the code inside the a-scene:
Now we can use the id to specify this image as a texture. In the opening tag of your sphere element, remove the color attribute and instead add a material attribute:
Let’s rotate the image a little so that the gradient hits a nice spot within the view–add a rotation property to the sphere element:
Yay now we have an empty globe!
Let’s put a photo inside it–we’ll use a cylinder, so add a new shape after the sphere:
We set the positioning to make the cylinder appear inside the sphere, and the radius is slightly smaller than the globe so that the glass is visible around it.
You can use your own photo if you’d like to personalize the snowglobe, but feel free to use any of these cute twemoji pics:
Upload your picture into assets and copy the URL again. You can include the twemoji pics using these URLs if you like instead:
- Santa https://cdn.glitch.me/04d3158d-1c2b-4dc5-ae7f-4f046499a21b/globe-santa.png?v=1639740868189
- Sloth https://cdn.glitch.me/04d3158d-1c2b-4dc5-ae7f-4f046499a21b/globe-sloth.png?v=1639740872078
- Heart https://cdn.glitch.me/04d3158d-1c2b-4dc5-ae7f-4f046499a21b/globe-heart.png?v=1639740879770
- Smiley https://cdn.glitch.me/04d3158d-1c2b-4dc5-ae7f-4f046499a21b/globe-smile.png?v=1639740883742
- Chick https://cdn.glitch.me/04d3158d-1c2b-4dc5-ae7f-4f046499a21b/globe-chick.png?v=1639740887359
- Fish https://cdn.glitch.me/04d3158d-1c2b-4dc5-ae7f-4f046499a21b/globe-fish.png?v=1639740891328 Add your pic URL to the cylinder as src attribute:
Let’s give the snowglobe a base too–add another cylinder shape after the one you added for the photo:
We have a snowglobe!
Add a greeting #
Now let’s add a message you can customize. 3D text is tricky in VR, so we’ll keep it simple and just use 2D–this time we’ll use an entity, which is a core A-Frame technique you’ll see much more of if you continue learning. The attributes represent A-Frame components, specifying the entity detail.
Change the text to read whatever you like! You may need to tweak the position to make it stay in the center of the display–experiment with the values!
Make it interactive #
OK so we have a nice looking scene, but it isn’t interactive yet. Let’s add some animated effects on the shapes when the user looks at them.
First we need a camera, add it near the top inside the scene markup:
The camera defines the user perspective on the scene, with look controls and a fuse cursor that will allow us to detect when the user is looking directly at a shape.
Let’s make the tree rotate when the user looks at it, by adding an animation attribute to the cone element:
We specify the property to animate, which is the rotation. Then we state the positions to rotate from and to, which is a change of 360 around the y axis. We set duration and easing properties, and set the animation not to repeat. We use the startEvents property to trigger the animation when the user looks at the shape.
You can simulate moving around the scene in the preview by clicking and dragging it, so drag the view so that the tree is in the center of the page (or look if you’re using a headset!)
Let’s do something similar with the parcel but we’ll make it expand a little. Add a slightly different animation to the box element:
We use the scale property and loop the animation twice, with alternate direction so that it returns to its original size each time. We also use elastic easing for a bouncy effect.
Let’s also give the snowglobe pic a little animation. Add it to the cylinder that has your uploaded photo displayed in it:
This is similar to the tree but it doesn’t rotate all the way around, just back and forth slightly to give a sense of the globe being a 3D shape.
As a final effect let’s animate the sky, making it continually rotate slowly:
Your scene should be looking pretty festive by now–share it with your friends!
Make sure you try it on a VR headset if you have one–just enter the URL for your Glitch app in the browser, e.g. https://festive-aframe.glitch.me
If you want to keep learning, try tweaking the different entities and property values in your project!
Next steps #
OK so we had some fun making a few light edits to the A-Frame base project to make a daft greetings card, but the WebXR community makes some seriously amazing immersive experiences on Glitch. Check out ~xrxmas for a cool snowing effect.
For inspiration check out the playlist of WebXR projects on Glitch. If you have a VR device remember to visit your apps on it–including a cardboard viewer on your phone! We’ve been delighted to see the WebXR development on Glitch and are excited to reveal some editor enhancements in the new year to help support the projects this community of creators is producing!

